If you're starting your cannabis growing adventure, mastering the germination process is absolutely fundamental. This is the first and most critical step that will determine the success of your cultivation. In this comprehensive guide, we'll show you all the proven methods, professional tricks, and practical tips to achieve a germination rate of 95% or higher.
The importance of good germination
Germination is the most delicate moment in a cannabis plant's life. During this process, the seed awakens from its dormancy and begins its development. Successful germination guarantees strong, healthy, and productive plants. Conversely, poor germination can result in weak plants or directly in the loss of valuable seeds.
Whether you work with regular seeds, feminized, autoflowering or CBD varieties, the fundamental principles of germination remain constant. Most importantly, you need quality seeds that have been properly stored, as fresh and well-stored seeds have significantly higher germination rates.
This guide explains how to store cannabis seeds while maintaining their germination power for years. The three critical factors are temperature (4-8°C), relative humidity (20-30%) and total darkness.
Necessary materials
Before starting, make sure you have all the materials prepared. Organization is key to success:
Basic materials:
- Quality cannabis seeds
- Distilled water or reverse osmosis water
- Fine-tipped tweezers (preferably sterilized)
- Thermometer and hygrometer
- Water spray bottle
- Disposable gloves (optional but recommended)
Germination media (choose one):
- Unbleached paper towels (most economical and popular)
- Cotton pads
- Peat or coco fiber Jiffys
- Rockwool blocks
- Root It propagation plugs or similar
- Seed trays with transparent lid
Complementary materials:
- Greenhouse or propagator with humidity control
- Clean plates or containers
- Final pots (1-2 liters for start)
- Quality substrate for cannabis
- Adequate lighting (LED or CFL lamps for start)
The 3 fundamental elements for success
Success in germination depends on the perfect balance of three environmental factors. Mastering these elements is the difference between success and failure:
1. Light: From darkness to sun
Germination phase (days 1-3): Seeds should be kept in complete darkness or semi-darkness. Light can inhibit the initial germination process. Place your seeds inside a closed closet, drawer, or opaque box.
Post-germination phase (day 4 onwards): Once the seedling emerges from the substrate, it needs light immediately. Provide 18 hours of light and 6 hours of darkness. The first leaves (cotyledons) will act as miniature solar panels.
Professional trick: If you use lamps, keep them at 30-40 cm distance at first to avoid burning the seedlings. Full-spectrum LED lamps are ideal for this phase.
2. Temperature: The critical factor
Optimal range: 22-26°C (with 24°C being the ideal temperature)
Acceptable range: 20-28°C
Dangerous range: Below 18°C or above 30°C
Cannabis comes from tropical and subtropical climates, so it needs constant warmth. Abrupt temperature fluctuations can stop or significantly slow germination.
Tricks to maintain temperature:
- Place the germination container on top of the internet router or any device that generates gentle, constant heat
- Use a heating mat for seedlings (highly recommended investment)
- In winter, place containers near a radiator (but not directly on top)
- Use a digital thermometer with alarms to constantly monitor
- Avoid cold drafts that can cool the seeds
3. Water and humidity: the perfect balance
Ideal pH: 6.0-6.5 (slightly acidic)
Ideal relative humidity: 70-90% during germination
Recommended water types:
- Distilled water (best option)
- Reverse osmosis water
- Bottled water with low mineralization
- Tap water left to stand for 24 hours (to eliminate chlorine)
Water tricks:
- Add 1-2 drops of hydrogen peroxide (3% hydrogen peroxide) per 100ml of water to prevent fungi and provide extra oxygen
- Some growers add root enzymes or germination stimulators at very low doses
- Keep water at room temperature (20-22°C) before use
- Never use water directly from the tap without letting it stand, chlorine can damage seeds
- Water should be moist but never waterlogged - think of a well-squeezed sponge
Prior preparation: Tricks before germinating
Seed Inspection
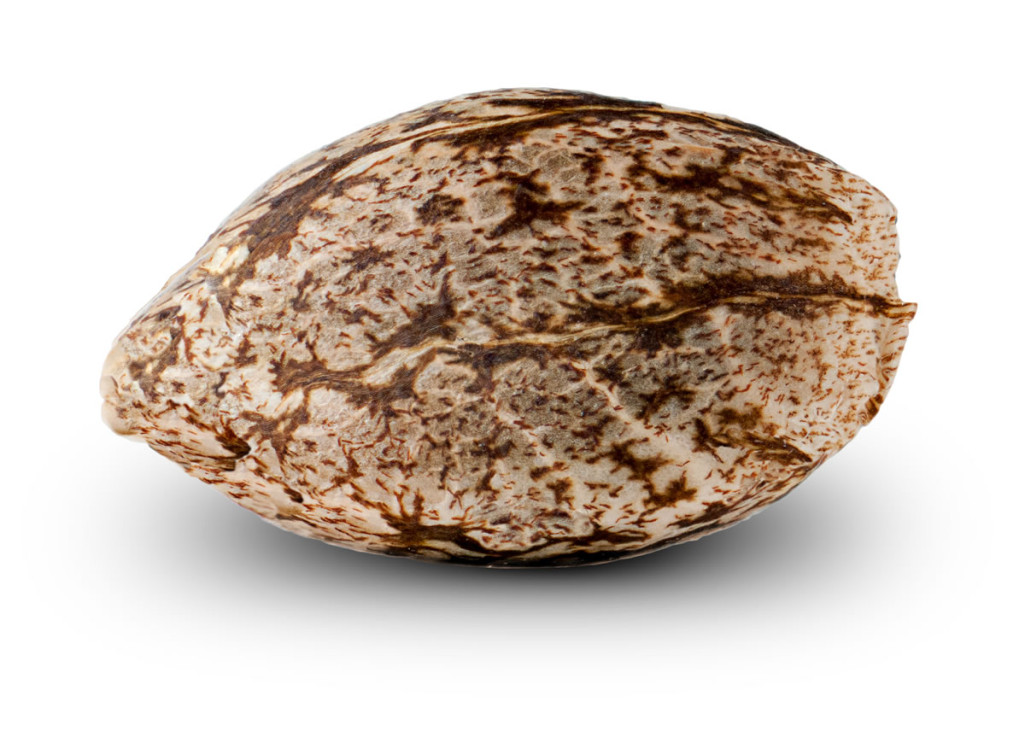
Before germinating, inspect your seeds. Quality seeds are:
- Dark brown in color with streaks or spots
- Hard to the touch (test with slight pressure - they shouldn't crush)
- With a shiny waxy layer
- Without cracks or greenish spots
Gentle scarification (Optional)
For very hard or old seeds, you can perform gentle scarification:
- Very gently rub the seed with fine-grit sandpaper (220-400)
- Only 2-3 gentle passes on one side
- This thins the shell and facilitates water entry
- Caution: Don't do this with fresh seeds or thin-shelled ones
Step-by-step marijuana seed germination methods
PHASE 1: Seed activation (Choose one of these methods)
Method A: Germination in water glass
Difficulty level: Easy | Success rate: 85-95% | Time: 24-48 hours
Procedure:
- Fill a clean glass with distilled water at 22-26°C
- Gently place seeds in the water with tweezers
- Seeds should sink within 24 hours (if they float, they may not be viable)
- Keep the glass in darkness at constant temperature
- After 12-24 hours, you should see the seed opening
- At 24-48 hours, the radicle (white root) of 2-5mm will appear
- Transplant immediately when the root measures 3-5mm
Specific tricks:
- Don't leave seeds more than 48 hours in water or they'll drown
- If at 36 hours they haven't germinated, transfer them to the paper method immediately
- Change the water every 12 hours if it takes longer than 24 hours
- Gently tap the glass every 12 hours to oxygenate the water
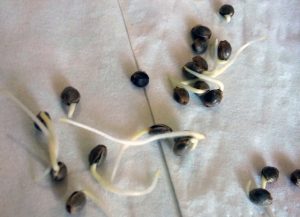
Method B: Germination with paper towel
Difficulty level: Very easy | Success rate: 90-98% | Time: 2-5 days
Procedure:
- Take 2-3 sheets of paper towel and fold them to create a pad
- Place the pad on a clean plate
- Moisten the paper with distilled water until completely wet but without puddles
- Drain excess by tilting the plate
- With tweezers, place seeds spaced on the paper (minimum 2-3 cm between them)
- Cover with another layer of moist paper (2-3 sheets)
- Place another plate on top or cover with plastic wrap leaving a small gap for breathing
- Store in dark, warm place
- Check twice daily and spray water if paper dries
- In 2-5 days you'll see the white radicle emerging
- Transplant when root measures 0.5-1 cm
Specific tricks:
- Use paper towels without perfumes or chemical bleaches
- Paper should always be moist, never dry or soaked
- Don't open the plate constantly - check maximum twice daily
- If you see mold, add a drop of hydrogen peroxide
- Mark seed orientation to know where the emerging root is
- Don't wait for the root to be very long (more than 2cm) or it will become fragile
Method C: direct germination in jiffy
Difficulty level: Easy | Success rate: 85-90% | Time: 3-7 days
Procedure:
- Place the jiffy in a container with warm water (24-28°C)
- Wait 5-10 minutes until it fully expands
- Remove it and squeeze gently to eliminate excessive water (should remain moist, not soaked)
- With a pencil or toothpick, make a 5-10mm hole in the center
- Place the seed with tweezers (if already germinated, with root facing down)
- Cover lightly with jiffy substrate
- Place jiffy in a propagator or greenhouse
- Maintain humidity by spraying daily
- In 3-7 days the seedling will emerge
Specific tricks:
- Jiffys dry quickly - check humidity twice daily
- Pierce the jiffy at the bottom with a toothpick to improve drainage
- You can soak the jiffy in water with diluted root stimulator
- Don't bury the seed more than 1cm deep
- Remove the jiffy's outer mesh before final transplant
PHASE 2: Transplant to final substrate
Optimal time to transplant:
- From paper/water: when root measures 0.5-1.5 cm
- From jiffy/rockwool: when seedling is 4-5 cm tall with 2-4 true leaves
Transplant procedure:
- Prepare pot with quality substrate
- Moisten substrate beforehand (crucial - never transplant dry)
- Make a 1-2 cm deep hole in the center
- With extreme care, take germinated seed with tweezers
- Place it with root facing down
- Cover gently with substrate without compacting
- Spray surface with water
- Place immediately under light (18/6)
Tricks for perfect transplant:
- Never touch the white root with your fingers - natural oils can damage it
- If root is very long and fragile, make the hole deeper instead of bending the root
- Maintain high ambient humidity (70-80%) first 3 days post-transplant
- Don't overwater - substrate should be moist, not waterlogged
- Use small pots initially (0.5-1 liter) to avoid overwatering
- Cover with a transparent glass first 2-3 days to create a mini greenhouse
Common errors in germinating cannabis seeds and how to avoid them
Excess water
Symptoms: Rotten seeds, mold, seeds that don't open
Solution: Medium should be moist, not soaked. If there are puddles, you're using too much water.
Touching seeds with hands
Problem: Oils and bacteria from hands can contaminate seeds
Solution: Always use clean tweezers or disposable gloves
Incorrect temperature
Symptoms: Very slow or no germination
Solution: Use thermometer and maintain constant temperature of 22-26°C
Burying too deep
Problem: Seedling fails to break the surface
Solution: Never more than 1-1.5 cm deep
Premature light
Problem: Exposing seeds to light during initial germination
Solution: Keep in darkness until seedling emerges
Impatience
Problem: Constantly opening container or unearthing seeds
Solution: Be patient. Some seeds take up to 7-10 days
Lack of ambient humidity
Symptoms: Seeds drying out, paper drying quickly
Solution: Use propagator, greenhouse, or cover with plastic/glass
Advanced tricks for germinating seeds
The flotation test
Before germinating, put seeds in water. Those that sink in 1-2 hours are viable. Those that float permanently may have problems, but don't automatically discard them - many germinate anyway.
Brief pre-soak
Soak seeds in warm water for 2-4 hours before using the paper method. This softens the shell and accelerates germination.
Nighttime temperature
A small temperature drop at night (2-3°C less) can stimulate germination by imitating natural conditions.
The ziplock bag method
Place the plate with paper inside a semi-closed ziplock bag. Creates a perfect microclimate with constant humidity and avoids having to check so frequently.
Compost tea for immersion
Some growers soak seeds in diluted compost tea (1:10) for 30 minutes before germinating. Provides beneficial microorganisms.
Early identification
Label each seed if germinating several varieties. Use colored toothpicks or small adhesive labels.
Light-dark cycle from day 1
Even though the seed is underground, start the 18/6 cycle from transplant. When it emerges, it will already be synchronized.
Gentle ventilation
Open the propagator 5-10 minutes daily to renew air and prevent mold. Do it at the warmest time of day.
Willow water
Water where you've soaked willow branches contains natural salicylic acid (rooting hormone). Use it to soak difficult seeds.
The sandpaper test
For very old seeds (more than 5 years), very gently pass fine sandpaper on one side of the shell before germinating.
Germination calendar: What to expect Each day
Day 0-1: Beginning
- Seed placed in germination medium
- Initial water absorption
- Shell begins to soften
Day 1-2: Activation
- Seed swells visibly
- In water method: seed sinks
- Start of internal metabolic process
Day 2-3: Opening
- Shell opens slightly
- White tip of radicle appears
- Optimal moment to transplant from water
Day 3-5: Root Growth
- Main root elongates
- In substrate: root seeks depth
- Stem begins to form
Day 5-7: Emergence
- Stem breaks substrate surface
- Stem loop appears (inverted U shape)
- Time to expose to light
Day 7-10: Seedling
- Cotyledons open (first round leaves)
- Stem straightens
- Intense green color
- Active photosynthesis begins
Day 10-14: Development
- First true leaves appear (serrated)
- Root system established
- Vigorous growth
- Ready for complete vegetative phase

Problem solving: Quick diagnosis
"My seed has been 7 days and hasn't germinated"
Possible causes:
- Old or low-quality seed
- Temperature too low
- Excess or lack of water
- Shell too hard
Action: Give it 3-5 more days. If it reaches 12-14 days, probably not viable.
"The seed germinated but doesn't emerge from substrate"
Possible causes:
- Buried too deep
- Substrate too compacted
- Shell still attached
Action: Carefully remove some upper substrate. If you see seedling struggling, help it gently.
"Mold appeared on paper/substrate"
Causes:
- Excess humidity
- Lack of ventilation
- Temperature too high
Action: Transfer immediately to new medium. Add diluted hydrogen peroxide. Improve ventilation.
"The seedling grew very stretched and weak"
Cause: Lack of light or light too far away
Action: Move light closer. Transplant burying the stretched stem deeper to stabilize.
"The cotyledons are yellow"
Causes:
- Excess nutrients in substrate
- Excess watering
- Light too intense
Action: Reduce watering. Move light away. If using pre-fertilized substrate, transplant to lighter substrate.
Post-germination care: The first 2 weeks
Watering
- First 5 days: only surface spraying 1-2 times daily
- Days 6-14: gentle watering when surface is dry, small amounts
- Never waterlog - substrate should drain well
- Use room temperature water
Lighting
- 18 hours of light, 6 of darkness
- LED lamp distance: 30-50cm
- CFL lamp distance: 15-25cm
- Gradually increase intensity over 2 weeks
Temperature and Humidity
- Temperature: 22-26°C (day) / 18-22°C (night)
- Humidity: 65-75%
- Avoid abrupt changes
- Good air circulation but without direct drafts
Nutrients
- First 2 weeks: NO fertilizer if using quality substrate
- Cotyledons and substrate provide everything necessary
- Over-fertilizing in this phase is error #1
Method comparison: Which to choose?
| Method | Difficulty | Success Rate | Time | Cost | Best for... |
|---|---|---|---|---|---|
| Paper towel | Very easy | 90-98% | 2-5 days | Very low | Beginners, maximum visual control |
| Water glass | Easy | 85-95% | 1-3 days | Very low | Fresh seeds, experienced growers |
| Peat jiffy | Easy | 85-90% | 3-7 days | Low-Medium | Single transplant, beginners |
| Rockwool | Medium | 80-90% | 3-7 days | Medium | Hydroponic crops |
| Direct in substrate | Medium | 75-85% | 5-10 days | Low | Outdoor, guerrilla, less handling |
| Root It plugs | Easy | 85-92% | 3-6 days | Medium-High | Professionals, best results |
Seed germination checklist
Before starting:
- Verified quality seeds
- All materials clean and sterilized
- Calibrated thermometer and hygrometer
- Germination space prepared (dark, warm)
- Distilled water at room temperature
- Lighting ready for post-germination phase
- Quality substrate and clean pots
During germination:
- Check temperature twice daily
- Verify medium humidity daily
- Don't open container more than twice daily
- Keep written record (start date, method, observations)
- Don't touch seeds with hands
- Be patient - don't force the process
After germination:
- Transplant with maximum care
- Expose immediately to adequate light
- Maintain humidity without excess
- Monitor daily the first weeks
- Don't fertilize for minimum 2 weeks
- Label varieties
- Photograph progress to learn
Cannabis seed germination is a simple process that requires attention to details and patience. The three key factors - adequate light, optimal temperature, and perfect humidity - are the foundation of success. With this complete guide, the professional tricks we've shared, and a little practice, you'll achieve germination rates above 90%.
Remember that each seed is a unique project. Some will germinate in 48 hours while others will take their time. The key is to provide optimal conditions and not unnecessarily interfere with the natural process.
Start with quality seeds, follow the steps methodically, apply the tricks we've shared, and soon you'll have strong and healthy seedlings ready to become productive plants. Germination is just the beginning of a fascinating journey in cannabis cultivation.
Final advice: Take detailed notes of each germination. Write down which method you used, how long it took, what worked and what didn't. With each cycle you'll learn and perfect your technique until you become an expert germinator.
Good luck with your cultivation and may all your seeds germinate successfully!