The spider mite represents one of the most feared and devastating pests in cannabis cultivation. This tiny enemy can ruin months of work in a matter of days if not detected and treated in time. In this comprehensive guide, we compile information to help you prevent, identify and eliminate this pest effectively.
 Female of the red mite Tetranychus urticae. Source: Gilles San Martin, CC BY-SA 2.0, Wikimedia Commons
What is the spider mite?
Despite its name, the spider mite is not a spider but a microscopic mite (Tetranychus urticae) from the Tetranychidae family. This organism has existed since the Jurassic Period, over 180 million years ago, making it one of the most successful and adapted herbivores on the planet.
Identifying characteristics:
- Size: Between 0.4 and 0.5 millimeters (almost invisible to the naked eye)
- Color: Varies from yellow, light/dark green, intense red, brown or almost black depending on its maturity, feeding and climate
- Legs: Larvae have 6 legs, adults have 8 legs
- Preferred location: Underside of leaves, where they deposit their eggs
- Reproduction: Extremely rapid. Females lay between 5 and 20 eggs daily, up to hundreds during their lifetime. The offspring are sexually active at 5 days and their complete cycle from egg to adult can last only 7-9 days under optimal conditions (high temperature and low humidity).
How to detect spider mite infestation in cannabis
Early detection is crucial. The spider mite leaves characteristic traces that evolve in three phases:
Phase 1 - Initial symptoms: White/yellow spots
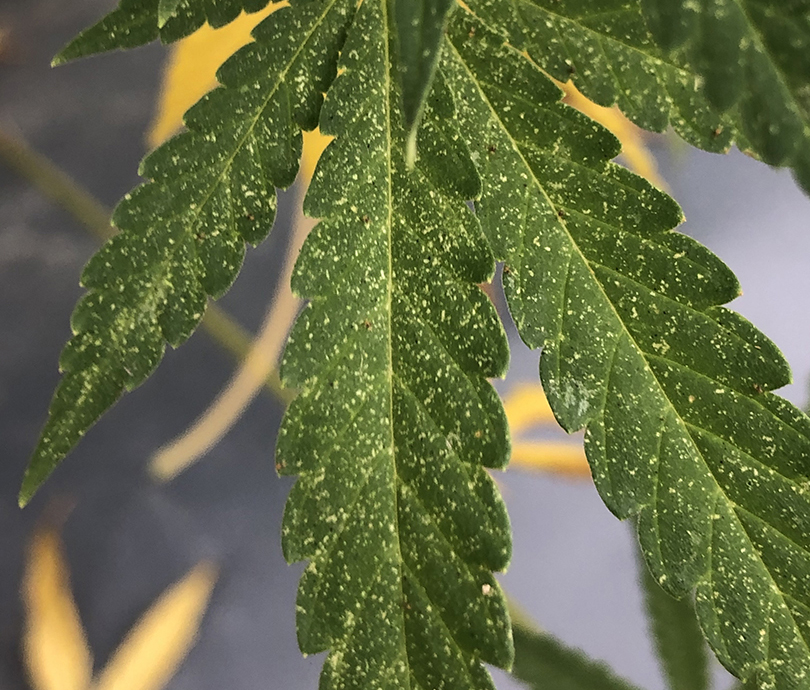 Feeding damage from two-spotted spider mite on hemp, evidenced by characteristic stippling on leaves. Image - USU Extension IPM Program
Small white-yellowish spots appear on the leaves, similar to pinpoints, generally bordering the main vein or thicker veins. These are the traces they leave when sucking the sap from the plant. At this stage you'll need a magnifying glass or microscope with 100x magnification to see the mites directly.
Grower's trick: Many beginners mistake these spots for nutritional deficiencies. If the spots expand rapidly and the leaves begin to turn gray-green or yellow, it's definitely spider mites.
Phase 2 - Appearance of webs
Very fine webs appear on the underside of leaves and between shoots. To make them more visible, spray water on the foliage and you'll see the webs clearly.
Phase 3 - Severe infestation
Plants become completely covered with webs, blocking stomata and preventing photosynthesis. Buds can be wrapped in these webs. At this stage, the plant is doomed if you don't act immediately.
Environmental conditions that favor spider mites
This mite thrives in specific environments:
- High temperature: Especially above 27-30°C
- Low humidity: Less than 50% relative humidity
- Lack of adequate ventilation
- Water stress: Plants in small pots with irregular watering
- Excess nitrogen: Very nitrogen-rich fertilizers favor their proliferation
- Time of year: Especially problematic in summer (July-August) and spring
Important: It is more common in indoor crops than outdoor, although it can attack both. Outdoors, the presence of natural predators helps keep them controlled.
Preventing the appearance of spider mites
As the saying goes among growers: Prevention is better than cure, especially with spider mites.
Environmental control:
- Temperature: Keep below 25°C (optimal 20-26°C)
- Relative humidity: Between 55-65% during vegetative, 50-60% in early flowering
- Ventilation: Install fans to create constant airflow
- Space between plants: Avoid overcrowding to improve circulation
Extreme hygiene:
- Completely disinfect the growing space between cycles (walls, floors, benches, tools, pots)
- Never enter the grow room with the same clothes from the street
- Remove plant debris immediately
- Don't reuse soil from previous indoor crops
- Check any new plant before introducing it to the crop
It's recommended to change clothes and even shower after visiting other crops, as mites can travel on our skin and clothing.
Regular crop inspection:
- Check the underside of leaves weekly with a magnifying glass
- Pay special attention to new shoots
- Install yellow sticky chromatic traps near plants
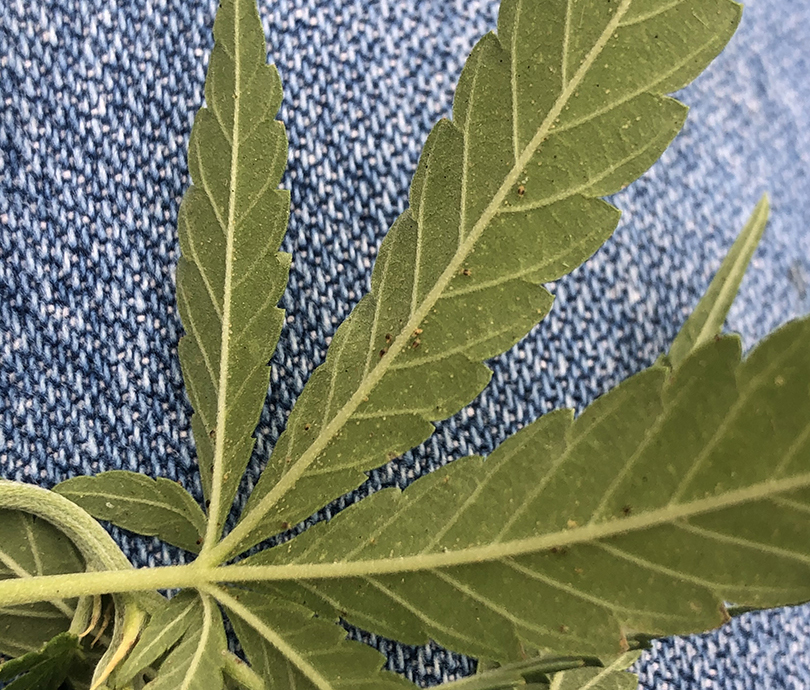 It is essential to check the underside of leaves weekly to quickly detect early signs of pests and avoid severe infestations. Image: Whitney Cranshaw, Colorado State University
Preventive products to avoid the appearance of spider mites:
Neem Oil: The favorite preventive of the cannabis community. Apply every 10-15 days in vegetative phase. Some growers completely submerge clones and young plants (pot included) in diluted Neem oil.
Potassium soap: Mixed with horsetail extract or alone, creates a hostile environment for mites.
Micronized sulfur: Effective but DO NOT use during flowering as it alters plant metabolism and kills beneficial predators.
Fortifiers: Products like Plant Vitality Plus or plant vaccines (ABBATON) that activate the plant's natural defenses.
Biological control of spider mites
The introduction of natural predators is considered by many growers as the most effective and sustainable method.
Specialized predatory mites
Phytoseiulus persimilis: The most effective predator. It feeds exclusively on spider mites, is very mobile and actively seeks its prey. Ideal for active infestations. Needs high humidity to survive (release them on the lower part of plants).
Neoseiulus californicus: Resistant to high temperatures and low humidity. Less mobile than Phytoseiulus (distribute evenly). Excellent for prevention and as a complement. Available in bags of 2500 and 25000 individuals.
Amblyseius andersoni: Generalist predator specialized in spider mites and micromites, also effective against thrips.
Amblyseius swirski: Another effective generalist predator.
Mite mix: Some grow shops sell mixes (50% andersonii + 50% californicus) for comprehensive prevention.
Other predators
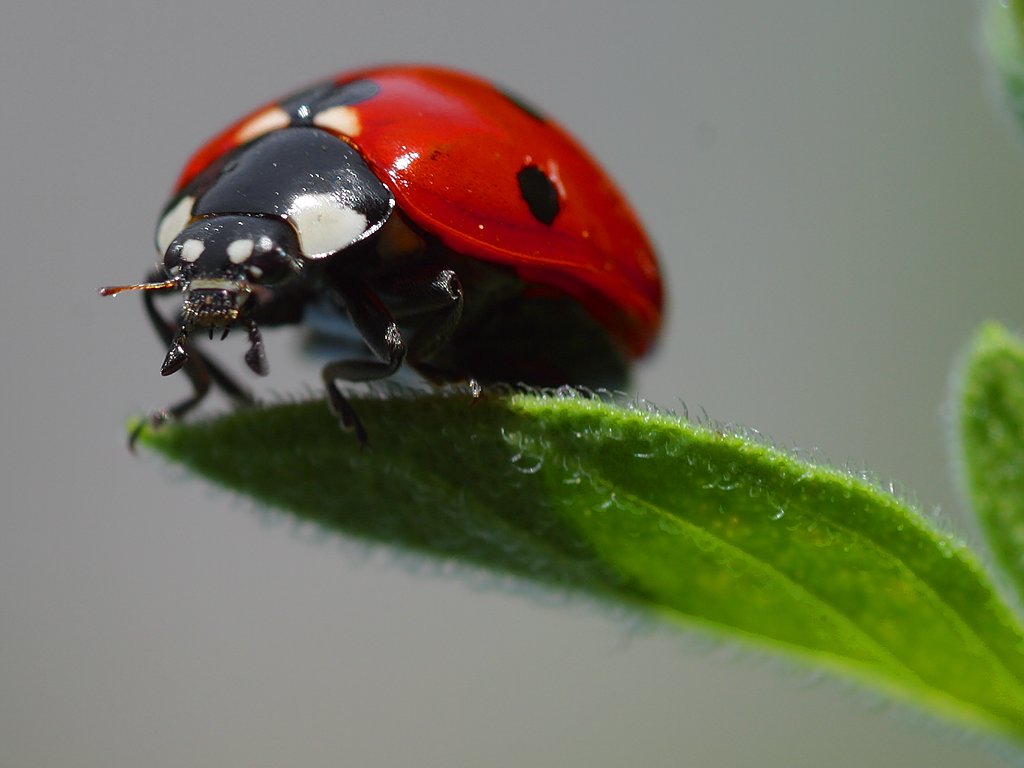 The introduction of Coccinella septempunctata, the seven-spotted ladybug, is considered by many growers as an effective and sustainable method for biological pest control in crops.
Macrolophus pygmaeus: Generalist predator that eats whitefly, thrips, aphids and spider mites. Very mobile but CAUTION: in absence of prey it feeds on plant fluids.
Ladybugs: Traditional and effective against mites, aphids and mealybugs. Compatible with Neem oil.
Delphastus pusillus: Specialized predatory beetle.
Keep in mind that if you release predators when there are less than 15 days until harvest, they may not have time to establish. Biological control requires planning and time.
Effective commercial products against spider mites
Treatments for vegetative phase
Spruzit: Insecticide-acaricide based on pyrethrins and rapeseed oil. Acts by suffocation, effective against eggs, larvae and adults. Only use until beginning of flowering. Apply with low light.
Spider Boom: Popular preventive, dilute 2ml/L in cold water, spray every 10 days.
Total Acaricide (Rodeno): In powder, prolonged action against eggs and larvae. Combine with product that kills adults.
Sulfur-Sofrex: Against mites and fungi. Do not use in flowering.
Solfac Automatic Forte: Automatic misting for complete disinfection of grow spaces.
Pyrethrum oil: Natural acaricide.
Treatments for flowering
During flowering NEVER use chemical insecticides as they remain too long in the plant and will affect the buds and final taste.
Safe options in flowering:
- BioNeem: 100% neem seed extract, zero residue
- Spruzit (only in very early flowering)
- Cinnaprot: Cinnamon-based fortifier, very effective against mites
- Plant Vitality Plus: Fortifier
- Potassium soap + pyrethrins: Preventive form
- Biological control: The best option for advanced flowering
Popular organic products:
- Tetramite 13 SL: Potassium salts of fatty acids and caraway oil
- Esencialprot: Citrus essential oils
- Urtinemax: Nettle extract
- Bio Neem from Prot-eco
Expert advice: Rotate active ingredients to prevent spider mites from developing resistance. Don't use the same product continuously.
Spider mite treatment during flowering
This is the most delicate situation. Spider mites in flowering are a nightmare because:
- Chemicals cannot be used
- Humidity must be controlled to avoid fungi
- Buds can be wrapped in webs
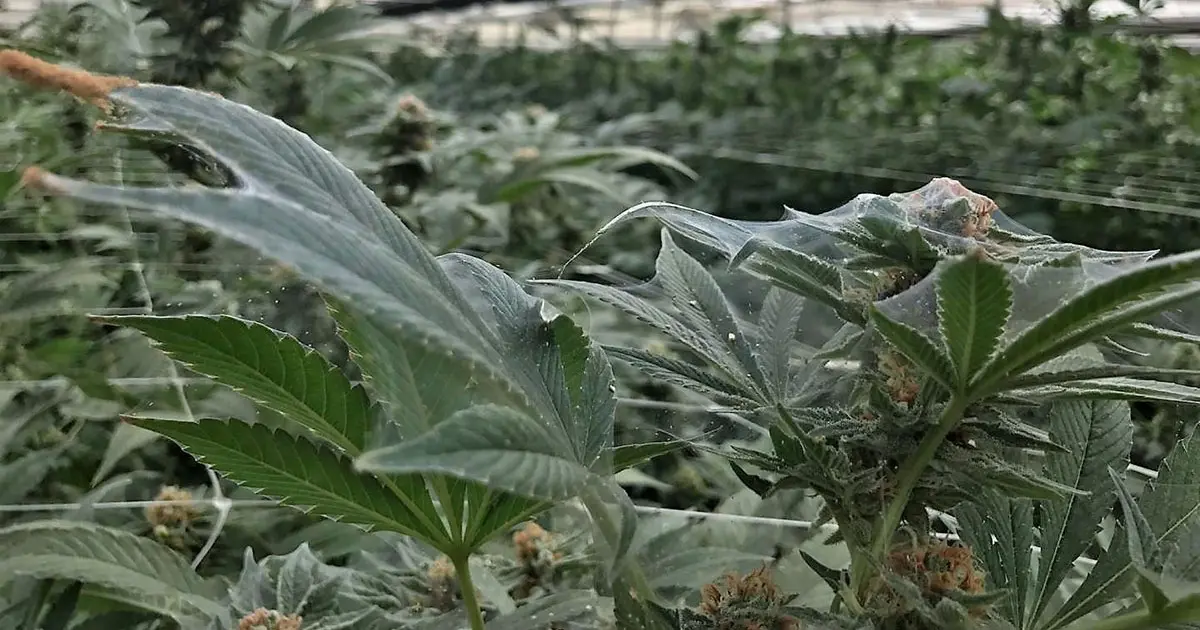 Infestation on cannabis plant in flowering stage. Image © 2025 Biobest
Weeks 1-4 of flowering: Sprayed biological products (Spruzit, Neem oil) can still be used with caution. Spray early in the day so it dries quickly.
Weeks 5-8 of flowering:
- Biological control with predators
- Cut heavily affected leaves
- Increase ventilation
- Lower temperature if possible
- Morning showers (controversial method): wet plants in the morning so they dry before strong sun. This maintains high humidity temporarily without risk of botrytis if done correctly.
Last weeks before harvest:
- Only cut affected parts
- Minimize spread
- Do not spray buds under any circumstances
- If necessary, harvest early to save what you can
How to completely eliminate spider mites from your cannabis crop?
When you detect the pest, follow this protocol:
1. Create hostile environment IMMEDIATELY:
- Lower temperature to below 25°C
- Raise humidity to 60% (if the phase allows)
- Increase ventilation
2. Extreme disinfection:
- Clean ALL the grow space
- Disinfect tools, pots, walls, floors
- Remove any plant debris
- Change or disinfect drainage trays
3. Plant treatment:
If you're in vegetative:
- Apply chemical or biological product every 3-5 days
- Make sure to cover the underside of all leaves
- Repeat treatment at least 3 times (eggs hatch later)
If you're in flowering:
- Release natural predators abundantly
- Apply organic products in early flowering
- Cut heavily affected leaves
4. Product rotation:
Alternate different acaricides or methods to avoid resistance:
- Week 1: Spruzit
- Week 2: Biological control
- Week 3: Neem oil + potassium soap
- Continue rotating
5. Constant monitoring:
- Check daily with magnifying glass
- Document evolution
- Be prepared for additional treatments
Prevention for the crop cycle
A detail that many forget: when you cut infested plants, spider mites abandon the dead plant matter forming groups of thousands of individuals on stems, stalks, threads and drying nets.
Post-harvest protocol:
- NEVER dry affected plants in the same space where you have active crop
- Remove spiders manually from stems and surfaces
- Use insecticide bombs for grow spaces (ADYBAC from Trabe)
- Clean with hydrogen peroxide or alcohol
- Rotate cleaning products every 24 hours
- Verify that enclosures are well sealed
- Leave the space in quarantine several days before the next crop
Important: Never reuse indoor soil.
Maximum alert signs
Seek professional help or take drastic measures if you see:
- Visible webs on multiple plants
- Leaves falling massively
- Plants in advanced flowering with buds wrapped in webs
- Resistance to treatments after 2-3 applications
- Colonies visible without magnifying glass
As we have seen, the spider mite is one of the most persistent and adaptable pests in cultivation, but it is not invincible. The key to success lies in constant vigilance, rigorous prevention and immediate action. By applying strategies of environmental control, hygiene and intelligent rotation of products (especially biological control), you will not only protect your current harvest, but also lay the foundations for a more resistant and healthy crop in the future. Remember that each cycle is an opportunity to learn to balance your growing ecosystem. With patience and dedication, you can master this tiny enemy.
Good smokes and pest-free crops.